Battle formation of step encounters is determined by following 3 factors:
The RNG table is as follows (BTW, this is exact same as Danger Limit Table):
  7 182 240  31  85  91  55 227 174  79 178  94 153 246 119 203
 96 143  67  62 167  76  45 136 199 104 215 209 194 242 193 221
170 147  22 247  38   4  54 161  70  78  86 190 108 110 128 213
181 142 164 158 231 202 206  33 255  15 212 140 230 211 152  71
244  13  21 237 196 228  53 120 186 218  39  97 171 185 195 125
133 252 149 107  48 173 134   0 141 205 126 159 229 239 219  89
235   5  20 201  36  44 160  60  68 105  64 113 100  58 116 124
132  19 148 156 150 172 180 188   3 222  84 220 197 216  12 183
 37  11   1  28  35  43  51  59 151  27  98  47 176 224 115 204
  2  74 254 155 163 109  25  56 117 189 102 135  63 175 243 251
131  10  18  26  34  83 144 207 122 139  82  90  73 106 114  40
 88 138 191  14   6 162 253 250  65 101 210  77 226  92  29  69
 30   9  17 179  95  41 121  57  46  42  81 217  93 166 234  49
129 137  16 103 245 169  66 130 112 157 146  87 225  61 241 249
238   8 145  24  32 177 165 187 198  72  80 154 214 127 123 233
118 223  50 111  52 168 208 184  99 200 192 236  75 232  23 248
pseudo code (Ruby-like):
$prev_step_encounter_id = 0
$step_encounter_number = 0

def step_encounter
  # add number before the determination of battle formation
  $step_encounter_number = ($step_encounter_number + 1) & 0xff
  rnd = RND_TABLE[$step_encounter_number]

  if rnd < 128 && current_map_encounter_ids[0] != $prev_step_encounter_id
    id = current_map_encounter_ids[0] # 128/256 = 50%
  elsif rnd < 192 && current_map_encounter_ids[1] != $prev_step_encounter_id
    id = current_map_encounter_ids[1] # 64/256 = 25%
  elsif rnd < 240 && current_map_encounter_ids[2] != $prev_step_encounter_id
    id = current_map_encounter_ids[2] # 48/256 = 18.75%
  else
    id = current_map_encounter_ids[3] # 16/256 = 6.25%
  end

  $prev_step_encounter_id = id
  return id
end
回復・蘇生・治療・GF解除・パーティ変更・パーティ編成画面。
| 戦闘の種類 | しきい値 | 逃走に掛かる時間 | 備考 | |
|---|---|---|---|---|
| 期待値 | 最悪値 | |||
| バックアタック・先制攻撃 | 255 | 1.00s | X-ATM092(修復中) | |
| 通常エンカウント | 128 | 1.98s | 10s | ルナパン通過戦闘・トライエッジ・ティアマト |
| 被バックアタック・被先制攻撃 | 16 | 11.54s | 41s | |
 99   6 240  35 248 229 168   1 193 174 127  72 123 177 220   9
 34 109 125 238 157  88 213  85  36  57 122 223 142  84 108  27
192  11 208  67 216 154  71  93  33   2  23  75 219  17 175 112
205  77  52  73 114 145  45  98 151  89  69 247 110  70 170  10
163 200  49 146  56 250 212 230 203 243 222 107 187 241  28  60
214 173 178 169 221  87  66 149  12 121  37  31 188 231 172  91
131  40 118 242  24 218 135 161  97 111 190  90  94  81 239 176
201  21 116 137 189 209 162 117 215 153 133  76  79 210 191  74
 32   8  86 160  80  58 103  38  65  51 183 186 251  48 207 124
132  44  50 233  29  22 130 120 164 128 101  95  14  39 185  25
195 167 182   0  59 252 136 225 198 147 254 139 217 184  19 105
 47 100  18  55 253 119 226 181   4 224  26 140 143 180 204 249
 96 235  41 227 144 165 104  61 129 115  63 171 126 179  15 206
196  53 148 150 134 113 211  42 228 159 156 236  78  20 245 234
 64 166 246   3 152 197   7 244  43 194  62 232 155  54  83  46
141  13  82  16 102  30 237 138  68 158   5 255  92 199 106 202
Since the Card RNG state is saved in savegames, we can practice with our savegame just before Ma Dincht.
It would be no longer an armchair theory that the way to take timing on the 1st game with counting EXACTLY how many times the Card RNG is used in battles, which I mentioned that there might be a possibility once. Though a grasp of the uses of the Card RNG in battles is required, if we look back recording of our current run and count the Card RNG during cutscenes which are commonly found among PS FF series, we won't feel burdened much.
Since the interval between Magical Lamp and Ma Dincht is not much enough to check up on counting in Diablos battle, it might be better to play with Ma Dincht before Diablos battle. In that case, the route is: Magical Lamp - Ma Dincht - Diablos.
This way saves about 40s compared to on the 2nd game. But it would be far more troublesome than on the 2nd game, which requires only inputs of Early Quistis pattern and the opening situation of the 1st game. Even if our count and the exact one differ only by 1, this way fails. That can be recovered on the next game, though.
This is for the case Zell card is drawn on the 1st game. So assuming that Ma Dincht has Zell card and there is not Draw pattern. Characteristics of Ma Dincht's AI is used to the order of placement that she never capture Geezard on the lower-right corner from the left-side of it and Gayla on the upper-left corner from the down-side of it except by Grat.
When we have initiative and Ma Dincht does't have Zell card, this procedure can't be applied because her 1st place changes. When we don't have initiative, by lack of Diablos, our winning rate is not 100% but perhaps more than 99%. If we place any card on wrong position, it is difficult to recover that and we might lose at the worst case.
| Player's Deck | ||||
|---|---|---|---|---|
| Geezard, Red Bat, Gayla, Ifrit, Quistis | ||||
| Order | Initiative | not Initiative | ||
| Win | Win | If a right-side value of the card on [Up] equals 1 | ||
| 1 | Red BatLower-Right | ZellUpper-Left | ||
| 2 | ZellRight | GeezardLower-Right | ||
| 3 | GeezardDown | Right | ||
| 4 | Center | IfritDown | ||
| 5 | IfritLower-Left | Up | ||
| 6 | Upper-Left | Red BatUpper-Right | GaylaLeft | |
| 7 | GaylaLeft | Left | Center or Lewer-Left | |
| 8 | Up | QuistisCenter | QuistisCenter > Upper-Right | |
| 9 | QuistisUpper-Right | Lower-Left | Lower-Left or Upper-Right | |
The Card RNG relates the follows:
The Card RNG is used not only in the card game but also in battle. And its state is increased by 1 per frame on the starting screen of the card game. The above factors make more difficult to specify it. It has the property such as the following:
Notice: There addresses are on JP/PS version.
For your information, Early Quistis stands on the following fact: When we play the card game soon after the beginning of the game and choose "Play" with 30/s autofire button, and that narrows down the Card RNG state to two values of 1+10=11 and 1+11=12.
The Card RNG is referred to as "RNG" in this Section.
First, we specify RNG state with the opening situation of the 1st game. Second, based on it, we take timing to let her draw Zell card on the next game. And then Ma Dincht draws Zell card. The above means that we can get Zell card on the 2nd game with her.
If we never enter the screen of the card game between the beginning of the game or Early Quistis and Ma Dincht then choose "Play" with the autofire button such as Early Quistis (no need 30/s speed), we can limit RNG state to searchable range. And we can specify it with the opening situation, 5 cards in her Deck and which side has initiative, of the 1st game. Because she draws cards from among the wide range of level 1, 2, 4 and 5, when she doesn't have Zell card, there are 43P5 * 2 = 231,023,520 ways, 5 cards from among 43 (except PUPU) * initiative, of the opening situation. Therefore we can pretty certainly specify RNG state with it.
The probability that Ma Dincht draws her rare card is 10%. In that case, on the starting screen of the card game, the frame where she draws it continues for 19 frames with a period of 190 frames. When we have already specified the current RNG state, we can specify the "Rare Card Frames" of the next game too. So, in theory, if we take timing of 19 frames (about 0.32s) on the starting screen, we can let her draw Zell card. But actually, because of environmental differences and reading time of CD-ROM, the range for timing is narrower. However, even if we fail to get Zell card by a failure of timing or drawn game, we can indefinitely continue to recover with repeat specifying RNG state with the opening situation of the failed game and taking timing on the next game over and over.
In theory, if we count EXACTLY how many times the Card RNG is used in battles until Ma Dincht, we can immediately take timing to get Zell card on the 1st game without one game to specify RNG state. But because RNG is used around 500~600 times from the beginning of the game to defeating Diablos, even if all uses of RNG are revealed, the way to get Zell card on the 1st game which requires counting all of them is unrealistic, I think. By any chance, there might be a possibility for that, though.
No matter what cards Ma Dincht has, we surely win if we follow this procedure. As for Draw pattern, though we will occasionally win, draw with high probability. If we draw with her on the 1st game to specify the Card RNG state, we can save about 2s. But considering it is required to input her deck on the 1st game, it might be unfavorable that the draw which we can't see a list of her deck at the end of the game.
We can play with Ma Dincht also just after Dollet before Diablos. But I guess that the advantage that the time for reset is moved forward is removed by this timing method. So Diablos is used in the notation.
| Player's Deck | ||||
|---|---|---|---|---|
| Funguar, Geezard (or whatever), Quistis, Diablos, Ifrit | ||||
| Order | Initiative | not Initiative | ||
| Win | Draw | Win | Draw | |
| 1 | FunguarUpper-Left | Upper-Left | ||
| 2 | Up or Left | FunguarLeft | ||
| 3 | DiablosLeft or Up | Up or Center or Lower-Left | ||
| 4 | Upper-Right | IfritLower-Right | ||
| 5 | IfritLower-Right | Up or Center or Lower-Left | ||
| 6 | Center | DiablosLower-Left or Center | ||
| 7 | QuistisRight | QuistisDown | Upper-Right | |
| 8 | Lower-Left or Down | Right or Lower-Left | QuistisRight | GeezardRight of Diablos |
| 9 | GeezardDown or Lower-Left | GeezardLower-Left or Right | Down | Right or Down |
On the way to get Zell card on the 2nd game, we specify RNG state and take timing of Rare Card Frames on the 2nd game based on it. But if we specify RNG state on the 2nd game too, while we never enter any battle between two games, we can take timing of Rare Card Frames on the 1st game with other card player after that. And that can be not only from Ma Dincht to other but also from other to her. I considered whether it can be done or not to add a twist to the way to get Quistis card:
As above, in any case seems not to work well. In conclusion, when we want both of Zell and Quistis card, I think it is the best way to get Quistis card with Early Quistis and Zell card with timing method after Diablos.
以下の敵の行動は、魔法を1種類以上所持しているキャラからランダムに1人を選択し、更にその所持魔法からランダムに1種類を選択し、ドリンクマジックとドローは1個、魔法消滅はその全てを消去する。
しかしその魔法選択率は所持魔法のバトル配置次第で大変な偏り方をみせることがある。魔法選択処理はだいたいこんな感じ。所持魔法の走査に用いるindex(0-based)の初期値が「0~所持魔法の種類の数-1」の範囲内の値しかとらないことがポイントで、空欄の存在が選択率に大きく影響するアルゴリズムになっている。
def select_spell
  index = rand(0..255) % kinds_of_spell
  while true
    spell = spell_inventory[index]
    return spell if spell != :blank

    index += 1
  end
end
n種類の魔法を所持しているとき選択率の分布が一様(256分率だけど)になるのは、1ページ目の1段目から順にn-1番目の欄まで空欄が存在しない、またはn=1の場合のみ。それ以外の場合は全て偏りが発生し、少なくとも一番下にある魔法が選択から除外される。最も極端な例を挙げると、一番上にある魔法よりも上にn-1個以上の空欄が存在する場合、一番上にある魔法が必ず選択されるなんてことがある。しかしこの仕様を利用すれば、ラスボス戦において僅かな種類のダミー魔法でトリプルをはじめとする重要魔法を確実に守れるはずだ。ダミーa種>ダミー以外b種の順に配置する場合、一番上のダミーよりも上にb個以上の空欄があれば、ダミーが全て消滅するまでダミー以外が選択されることはない。
具体的な挙動はシミュレータを弄って確認してみてください。
かなりめんどくさいっす。
FF8では乱数が用途別にいくつも存在し、そのひとつにフィールド上での雑多なものごとに関わるものがある。その乱数を「フィールド乱数」と呼ぶ。フィールド乱数が関わるものごとには例えば以下のようなものがある。
以下、この節でいう「乱数」は全て「フィールド乱数」を指すものとする。アルティミシア戦の初期パーティ決定にはフィールド乱数以外の種類の乱数は関わらないので。
フィールド乱数の元になる「乱数の状態」は、乱数の状態をXとおいてその初期値を1とする漸化式「Xn+1 = (Xn * 0x41c64e6d + 0x3039) mod 0x100000000」で計算される。そしてこの乱数の状態Xから「((X / 0x10000) mod 0x8000) mod 0x100」として計算された0~255の値がフィールド乱数として用いられる。これは乱数の状態Xの上位9~16bitにあたる。
擬似Rubyコードで表すとこんな感じになる。ちなみに乱数の状態を求める漸化式は初期値の決め方以外PS版DQ4やDQ7と全く同じもの。ただ単にメジャーかつシンプルなアルゴリズムだから被っただけなんだろうけどね。
$rng_state = 0x0000_0001
def field_rng()
  $rng_state = ($rng_state * 0x41c6_4e6d + 0x3039) & 0xffff_ffff
  return ($rng_state >> 16) & 0x7fff & 0xff
  # 厳密にいうと & 0xff は返り値を受け取った呼び出し元で行っているが
end
以下は日本語版でのそれぞれのアドレス。乱数の状態はFF8 - Caraway Code retro-engineeringでSequenceと呼ばれている値と恐らく同じものだが、言語が異なるためアドレスも異なる。
自分の確認した限り、乱数の状態が「乱数の消費」と「ハードリセット(初期値の1に戻る)」以外の要素で変更されることはない。つまり、現在の乱数の位置を特定できれば以降の乱数は全て予測できる。……というか、既にそれはカーウェイ邸番号探索でされているけれど。
ラスボス直前の最終マップにいる間(視点切り替え後含む)は0.5秒経過するたび乱数が1個消費される。これを「空回し」と呼ぶ。ただただ消費されているだけで、なにかに使われるわけではない。
# map#:583, label:91 から一部抜粋

while true
  wait(15/30s)
  rnd()
end
アルティミシア戦の初期パーティは、開いた扉が静止した直後に乱数を1個消費して決定される。これを「最終パーティ選定」と呼ぶ。6C3の全20通りからランダムに選択されるが、「セリキ」のみ9/256≒3.5%で他は13/256≒5.1%である。
# map#:583, label:70 から一部抜粋&簡略化

temp = rnd()
# tempの範囲は0..255
if temp < 13
  setparty(ゼスア)
elsif temp < 26
  setparty(ゼスリ)
elsif temp < 39
  setparty(ゼスセ)
elsif temp < 52
  setparty(ゼスキ)
elsif temp < 65
  setparty(アスリ)
elsif temp < 78
  setparty(アスセ)
elsif temp < 91
  setparty(アスキ)
elsif temp < 104
  setparty(リスセ)
elsif temp < 117
  setparty(リスキ)
elsif temp < 130
  setparty(セスキ)
elsif temp < 143
  setparty(アゼリ)
elsif temp < 156
  setparty(アゼセ)
elsif temp < 169
  setparty(アゼキ)
elsif temp < 182
  setparty(リゼセ)
elsif temp < 195
  setparty(リゼキ)
elsif temp < 208
  setparty(セゼキ)
elsif temp < 221
  setparty(リアセ)
elsif temp < 234
  setparty(リアキ)
elsif temp < 247
  setparty(セアキ)
else
  setparty(セリキ)
end
ハードリセット後にアルティミシア城前のセーブデータから再開し、最後の道の移動と選択肢を最速で進行した場合のパーティは「ゼスキ」または「アスリ」になる。「ゼスキ」は最終パーティ選定に44個目の乱数が使用されたことを、「アスリ」は45個目が使用されたことを意味する。つまり44個目が空回しされるかされないかのタイミングで最終パーティ選定が実行されるというわけで、このことから最終マップを最速で進行した場合、マップinから最終パーティ選定までの空回し継続時間は0.5*44=約22.0sと考えられる。確実に45個目の乱数を適用したいときは空回しタイミングのちょうど中間をみて、滞在時間を約0.25s伸ばすといいだろう。45+n個目を適用したいなら0.5n+0.25s伸ばす。後述する方法でパーティを固定させるときもこの0.25sは必須である。
エミュレータ(ARBEX100606)と実機(PS版FF8日本語版・SCPH-90000(高速モード))では空回し継続時間に差があるようだったためこれは実機で調査した。なお、扉のテキストを送る最中も空回しは続いているため、テキスト長の異なる他言語版に22.0sをそのまま適用することはできない。
メニュー操作を最終マップで行うとき、メニュー開閉n回につき空回し時間が(n-1)*2fだけ伸びる。ただし扉に近すぎると伸び幅が大きい(超接近して1回開閉しただけで空回しが12f(0.2s)伸びたのを確認)。メニュー開閉を何度も繰り返すことなんて普通はないから、扉のすぐ傍でしない限りは最終マップでメニュー操作を行っても空回しへの影響はほぼないということになる。扉のテキスト送りが遅れるかもしれないが(□連射?)。
アデル戦後の時間圧縮ムービーが流れている最中、スコールはコントローラの入力次第で様々な動きを見せる。このときアニメーションが開始されるタイミングで△○×□↑↓←→のどのボタンも押されていなければ、乱数が1個消費され↑↓←→いずれかの動きがランダムに行われる。この乱数消費は画面に空が映った直後に開始され、途中鳥の大群に覆われてスコールが見えなくなった後も続き、画面がホワイトアウトする直前を最後に終了する。ムービー中終始無入力状態のときに消費される乱数の数は45個で、その周期は平均101f≒約1.68sである。「平均」と表現しているのは、乱数消費によるアニメーションの場合「→」が他の方向より4f長くなるからだ(方向キー入力時の動きの周期は常に100fなので、無入力時は動き1回につき平均1f遅れる計算になる)。
| ボタン | → | ← | ↓ | ↑ | ○ | □ | × | △ | |
|---|---|---|---|---|---|---|---|---|---|
| アニメーションのフレーム数 | by 手動 | 100 | 100 | 100 | 100 | 108 | 116 | 108 | 116 |
| by 乱数 | 104 | 100 | 100 | 100 | - | - | - | - | |
| 無入力時 rnd() & 3 | 3 | 2 | 1 | 0 | - | - | - | - | |
# map#:351, label:8 から一部抜粋&簡略化
while true
  animation = 0

  # 押下されているボタンによってアニメーションが決まる
  # 下にいくほど優先順位高
  animation = 5 if keyscan(△)
  animation = 6 if keyscan(×)
  animation = 7 if keyscan(□)
  animation = 8 if keyscan(○)
  animation = 1 if keyscan(↑)
  animation = 2 if keyscan(↓)
  animation = 3 if keyscan(←)
  animation = 4 if keyscan(→)

  # △×□○↑↓←→どれも押されていない場合、
  # フィールド乱数を消費して↑↓←→のうちどれかのアニメーションが選択される
  animation = 1 + (rnd() & 3) if animation == 0

  if animation == 5
    animekeep(6)
  elsif animation == 6
    animekeep(7)
  elsif animation == 7
    animekeep(8)
  elsif animation == 8
    animekeep(9)
  elsif animation == 1
    animekeep(10)
  elsif animation == 2
    animekeep(11)
  elsif animation == 3
    animekeep(12)
  elsif animation == 4
    animekeep(13)
  end
end
自分が考えているロスなしパーティ固定法とは、ムービー中のスコールの5~16回目の動きをみて現在の乱数の位置を特定し、20から45個目までの0~26の範囲で任意の数だけ乱数を消費することで目当てのパーティを選定させようというもの。うまく行けばロスは最終マップでの0.25sだけで済む。具体的にとる行動は以下の通り。
| 常時無入力時の乱数の番号 | ムービー中のスコール | パーティ固定のためのプレイヤーの行動 |
|---|---|---|
| 1~3 | 視認できない。 | 次に備えて何も入力しないようにする。オート連射も当然オフにする。テキストを送らなくてもタイムは落ちない。 |
| 4~15 | 視認できるようになる。 | 無入力状態を維持しつつ、乱数特定用の12回分の動きを記録する。12回目の動きを確認したらすぐ十字キーorアナログスティックをどの方向でもいいから入れ続ける。 |
| 16~19 | ゼルが邪魔になったりして視認しにくくなる。 | 引き続き方向キーを入れ続けて乱数消費を阻害しつつ、記録した動きから乱数の特定作業を行う。 |
| 20~33 | 画面が海中に切り替わったあと、また視認できるようになる。 | スムーズに特定できたなら、スコールが海に飛び込むムービー後に画面が海中へ切り替わる瞬間に合わせてコントローラから指を離し、無入力状態を「1.68*乱数を進めたい数 s」持続して乱数を消費させる。 特定に手間取ってそのタイミングに間に合わなかった場合は、スコールの動きをみて乱数消費の中間の辺りを見計らいコントローラから指を離す。 必要なだけ消費させたらまたボタンを押し続け(このときは△○×□でもよい)、乱数を動かさないようにする。 |
| 34~44 | 鳥の大群に覆われる。これ以降は全く視認できない。 | |
| 45 | 画面がホワイトアウトする直前。 | ムービー中最後の乱数消費ポイント。ここを過ぎてもまだ必要なだけ乱数を消費できていない場合、残りの回数はドローポイントまたは最終マップで消費する。 |
| ムービー終了後 | ||
| ドローポイント or 最終マップ | 残りのn回を消費する。ドローポイントをn回調べる(1回/0.6s)か、最終マップで0.5*n s待機する。 | |
| 最終マップ | 待機なり斜め移動なりして滞在時間を0.25s伸ばす。 | |
ドローポイントを調べれば、パーティにドロー要員がいなかろうがアルティミシア城内でドローが封印されていようが既にそこからドロー済みであろうが、乱数が必ず1個だけ消費される。カウントにだけ集中できるので特定後の乱数消費手段の中では最も安全な方法といえる。調べるドローポイントはSeeD達の傍のトリプルか中庭のスロウがいいだろう。
乱数の範囲を1500~3500とかなり広くとって動きの重複を探索してみても一組も見つからなかった。これはつまり、RTA中の乱数の現在位置は、スコールの連続する12回の動きを見れば確実に特定できるということを意味する(はず)。さすが4^12通りだ、誕生日攻撃を喰らっても問題ないぜ。
しかしこの方法には手間が掛かる以外にも大きな問題があって、それは目当てのパーティに固定するのに手頃な乱数消費数で済むとは限らないというものだ。ハードリセットを伴うパーティ固定法ならば乱数が常に同じ位置にあることが保証されているからその心配はないのだが。……Disc3終了時のセーブ&リセットで乱数を初期化してアデル後ムービーで乱数を0~45個消費することでディスク交換ロスを吸収しつつパーティを全20パターンから選択できる、というセーブリセ再現の改善案みたいなボツ案もあった。
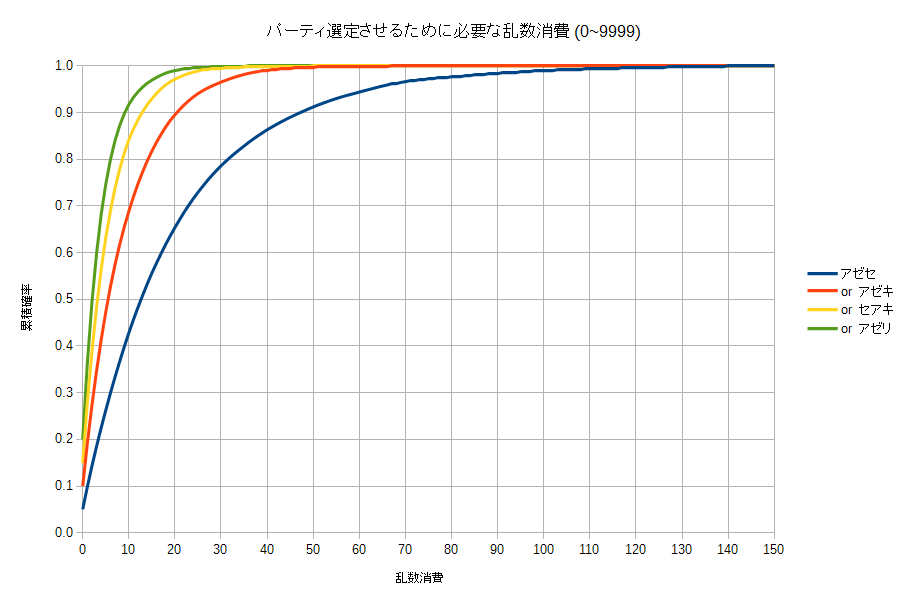
それはさておき、固定する目標に単一ではなく複数のパーティを設定し、その中で乱数の消費数が最も少ないパーティを採用することでこの問題の解消を試みる。左のグラフは乱数の範囲0~9999で目標パーティ数1~4のとき必要となる乱数消費の累積分布だ。パーティ数1のときの乱数消費の多さが目につく。ここではアーヴァイン+低Lvキャラの組み合わせとなるパーティを目標に設定しているが、唯一確率の低い「セリキ」を選択しない限りは他のパーティでもだいたい同じ結果になるはずだ。
速やかに乱数特定を終えムービーが終わるまでに乱数を26個消費できる場合、乱数消費を後に持ち越すことなくムービー中に済ませられる確率は目標パーティ数1では74.2%しかないが、2なら94.7%。3と4なら99%超でほぼ間違いなくロスなく済ませられる。また、特定に多少手間取って20個しか消費できない場合も目標パーティ数3なら97.2%、4なら99.0%である。
| 乱数消費 | アゼセ | or アゼキ | or セアキ | or アゼリ |
|---|---|---|---|---|
| 0~20個 | 65.4% | 89.6% | 97.2% | 99.0% |
| 0~26個 | 74.2% | 94.7% | 99.1% | 99.7% |
戦略レベルに影響が及ぶかもしれないが、手頃な乱数消費でパーティを引けない問題は目標パーティを3個以上設定すれば解消できる、と考えていいのではないだろうか。他にエンカウント歩数への影響とか実際のプレイでの乱数の位置はどこじゃだとかいろいろあるかもしれないけれど、とりあえずこんなところで。
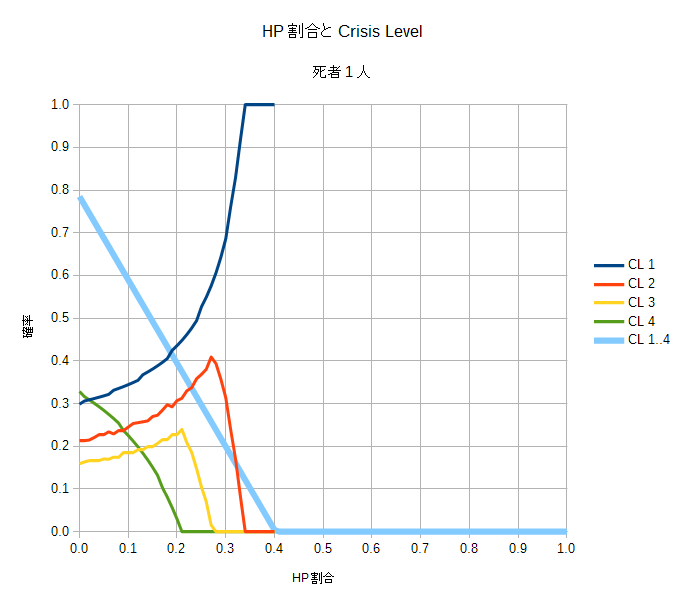
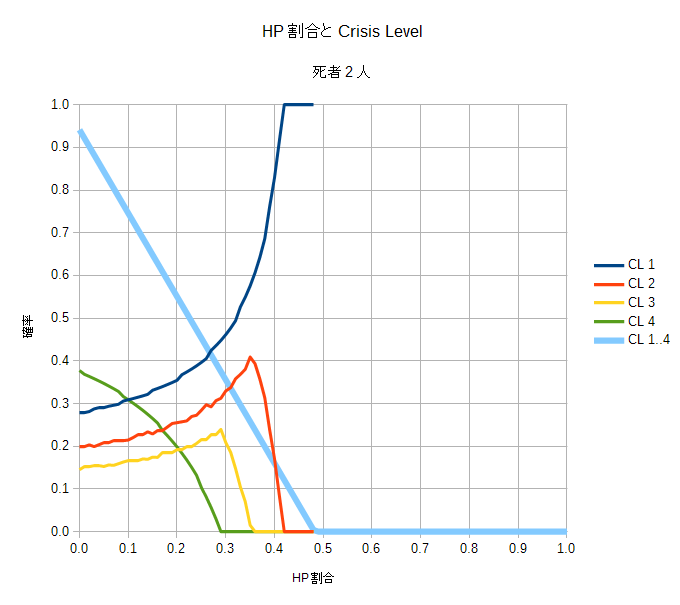
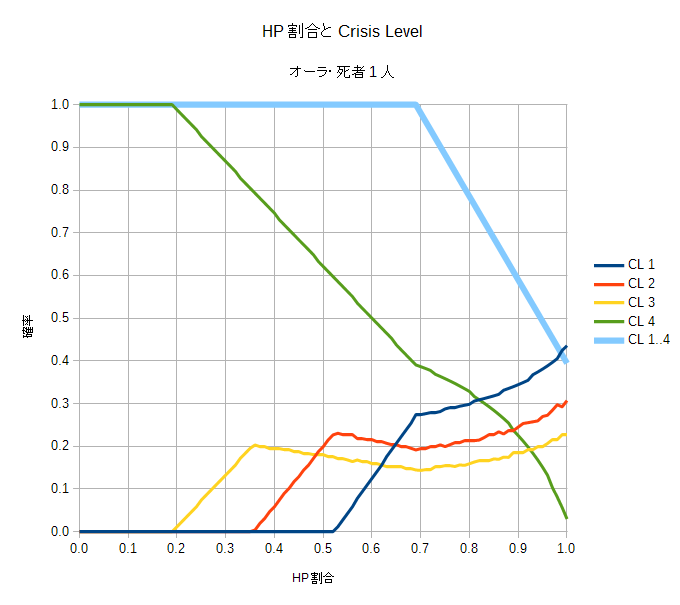
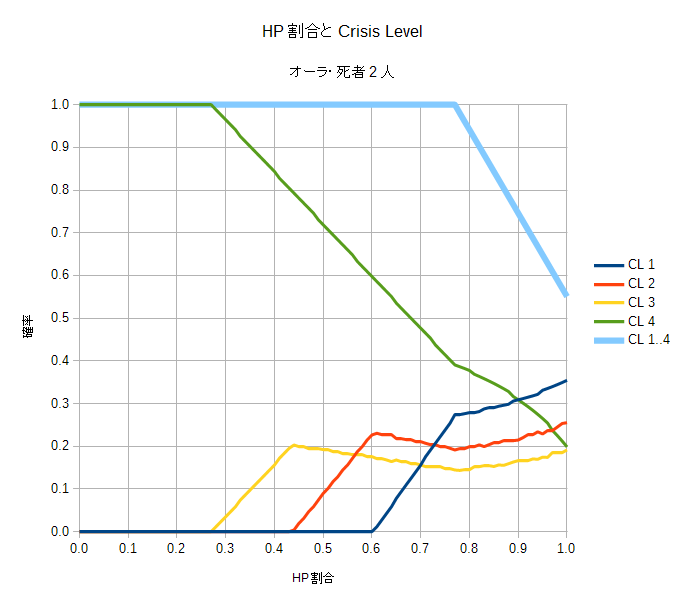
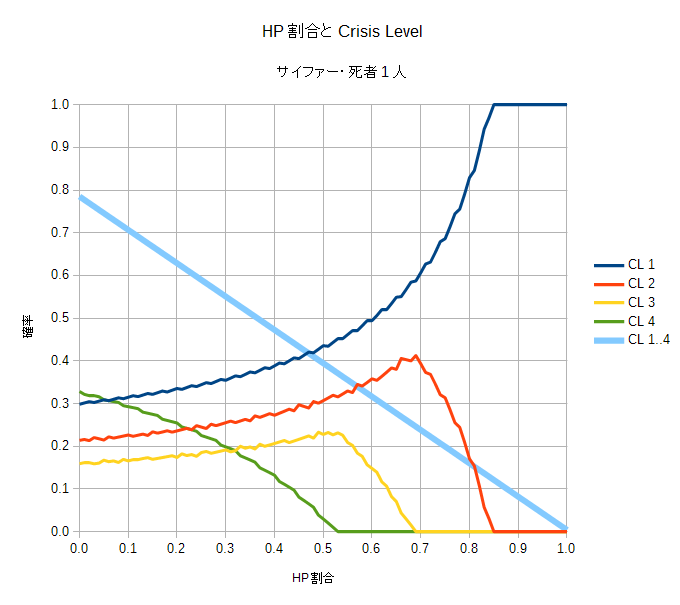
Crisis Level = ピンチ度でした。
| Dead | 0 | 1 | 2 |
|---|---|---|---|
| Normal | 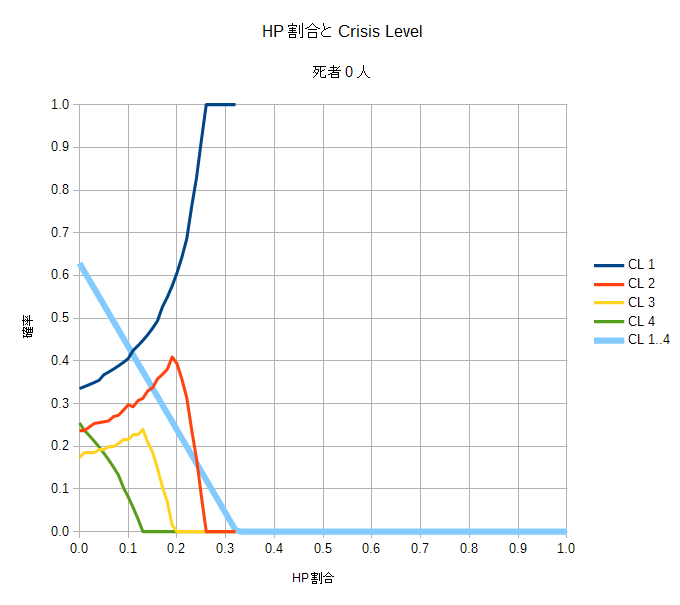 |
 |
 |
| Aura Status |  |
 |
 |
| Seifer | 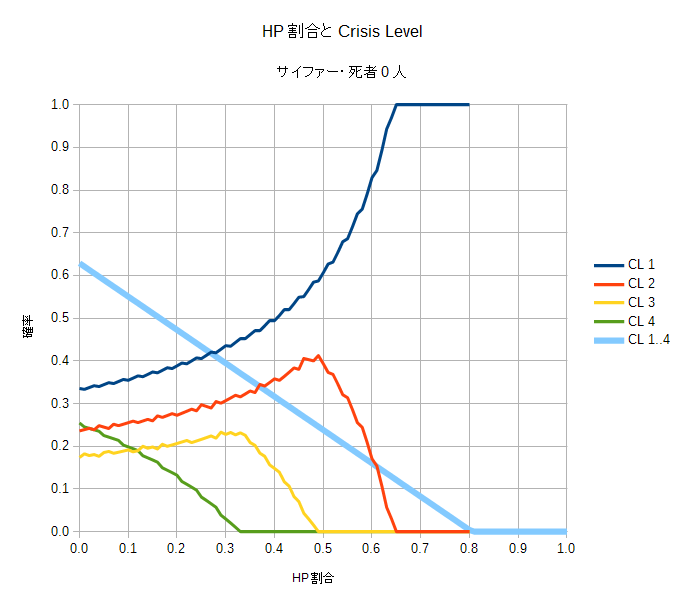 |
 |
 |
日本語のPS版FF8でしか確認してないっす。以下特徴。